
Read Time11 Minute, 12 Second
One of my previous articles provided a step-by-step guide to invoke OpenAI APIs from AWS Lambda functions. This article expands the topic by front-ending the Lambda function with a REST API built with Amazon API Gateway.
Contents
Introduction
This article will take you through the step-by-step process to build a REST API using API Gateway. The API invokes a Lambda function that in turn invokes OpenAI APIs and returns a response. Your applications can invoke this API to embed Artificial Intelligence capabilities similar to ChatGPT. Note that this article walks you through the very basic API Gateway features and options to build a bare-bones working API that can invoke a Lambda function and return a response. API Gateway provides several other features that are not covered in this article. Also, this example does not use authentication, please consider using a supported authentication method to protect your APIs from unauthorized use and DDoS attacks.
Prerequisites
- Familiarity with OpenAI APIs and how to invoke them from an AWS Lambda function.
- An OpenAI account and a Secret key
- An AWS account
Check out How to invoke OpenAI APIs from AWS Lambda functions before reading this article.
Create the API
In this example, we’ll build a REST API with a POST method and pass on the input prompt in the method body as raw JSON. The input prompt will be passed on to the Lambda function that houses the logic to invoke OpenAI APIs.
- Login to your AWS console
- Go to Services -> API Gateway
- Select APIs from the left menu
- Click on the Create API button on the top-right
- Under Choose an API type, select REST API (not REST API Private) and click Build
- Under Choose the protocol, leave REST selected
- Under Create new API, select New API
- Enter an API name, for example “apigw_invoke_openai_api”
- Leave Endpoint type as Regional
Regional APIs are deployed in the current region. Edge Optimized APIs are deployed to the CloudFront network. Private APIs are accessible only from VPCs.
At this point, your screen should look like this:

Click the Create API button.
The next screen takes you to the Resources section where you can define your methods.
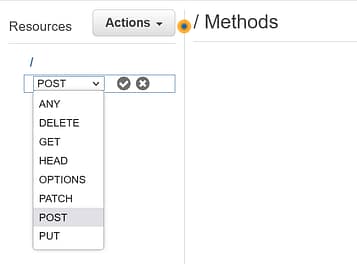
- Click on the Actions dropdown button
- Select Create method
- From the resulting dropdown, select POST and click on the Tick button.
Select Integration type as Lambda function, select your region and select the Lambda function that you created in the previous article (e.g. openai_invoke_api)
At this point, your screen should look like this:
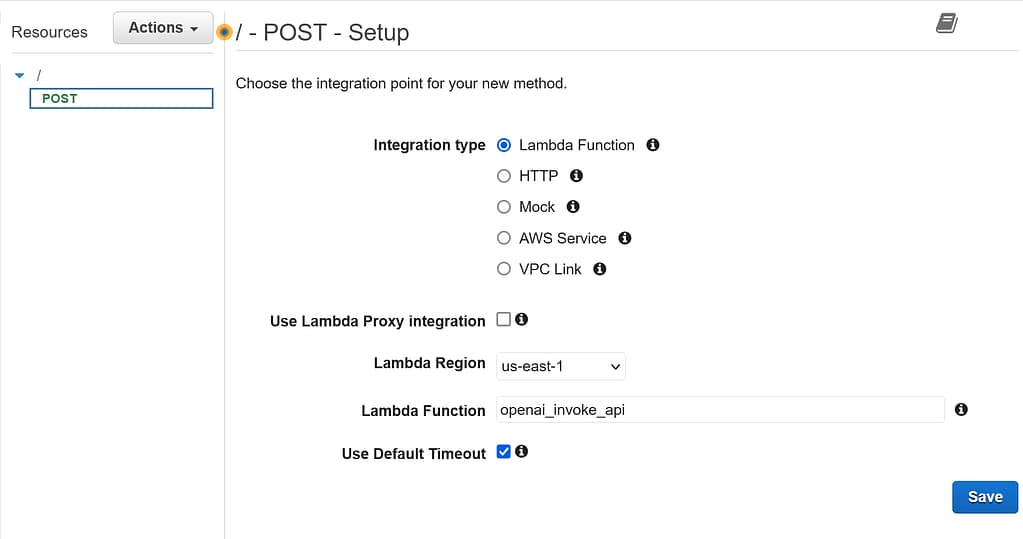
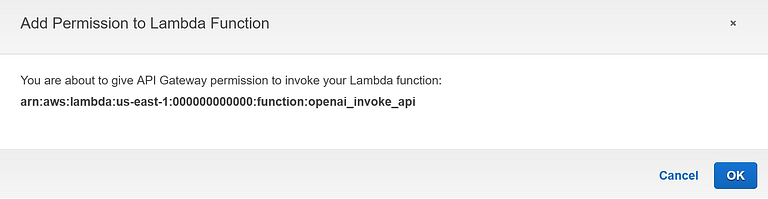
Click on the Save button, and click OK in the resulting popup warning you about giving Lambda access permission to your API.
In the next screen, you will be able to configure the Integration Request and Integration Response as shown here:
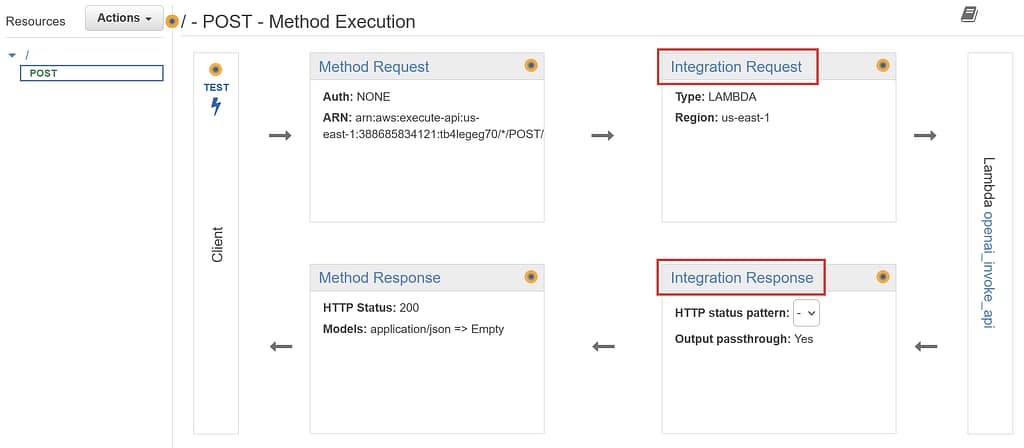
Integration Request
Since we have defined a POST method and not a GET method, we do not have to define any query parameters. Instead, we define Mapping Templates to tell API Gateway how to handle and parse fields passed on in the request body. Mapping Templates are based on Apache Velocity Templating Language and allow us to validate and modify incoming request to a format that is required by the backend services that power the API. In this example, we’ll use Mapping Templates to map fields sent in request body to input parameters required by the Lambda function.
Click Integration Request link and expand the Mapping Templates section.
- Select When there are no templates defined (recommended) option
- Click the Add mapping template link, enter application/json in the Content-Type textbox and click the Tick icon.
- Click on the application/json link that is created and then select Method Request passthrough option from the Generate template dropdown.
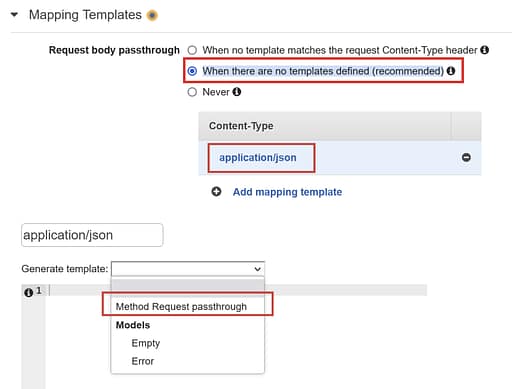
The following Velocity mapping template is automatically generated. This code automatically maps the entire request body inside the body-json JSON element, and also maps every individual parameter under the params element.
##  See http://docs.aws.amazon.com/apigateway/latest/developerguide/api-gateway-mapping-template-reference.html
##  This template will pass through all parameters including path, querystring, header, stage variables, and context through to the integration endpoint via the body/payload
#set($allParams = $input.params())
{
"body-json" : $input.json('$'),
"params" : {
#foreach($type in $allParams.keySet())
    #set($params = $allParams.get($type))
"$type" : {
    #foreach($paramName in $params.keySet())
    "$paramName" : "$util.escapeJavaScript($params.get($paramName))"
        #if($foreach.hasNext),#end
    #end
}
    #if($foreach.hasNext),#end
#end
},
"stage-variables" : {
#foreach($key in $stageVariables.keySet())
"$key" : "$util.escapeJavaScript($stageVariables.get($key))"
    #if($foreach.hasNext),#end
#end
},
"context" : {
    "account-id" : "$context.identity.accountId",
    "api-id" : "$context.apiId",
    "api-key" : "$context.identity.apiKey",
    "authorizer-principal-id" : "$context.authorizer.principalId",
    "caller" : "$context.identity.caller",
    "cognito-authentication-provider" : "$context.identity.cognitoAuthenticationProvider",
    "cognito-authentication-type" : "$context.identity.cognitoAuthenticationType",
    "cognito-identity-id" : "$context.identity.cognitoIdentityId",
    "cognito-identity-pool-id" : "$context.identity.cognitoIdentityPoolId",
    "http-method" : "$context.httpMethod",
    "stage" : "$context.stage",
    "source-ip" : "$context.identity.sourceIp",
    "user" : "$context.identity.user",
    "user-agent" : "$context.identity.userAgent",
    "user-arn" : "$context.identity.userArn",
    "request-id" : "$context.requestId",
    "resource-id" : "$context.resourceId",
    "resource-path" : "$context.resourcePath"
    }
}
Click the Save button to save the template.
Integration Response
- Navigate to the Method Execution screen
- Click Integration Response link
- Expand the default row (with Method response status = 200) in the table
- Expand the Mapping Templates section
- Click the Add mapping template link, enter application/json in the Content-Type textbox and click the Tick icon. There is no need to define a Mapping Template for the response as the response from the Lambda function would be returned by the REST API “as-is” without any transformations.
Modify the Lambda function
Before testing the API that we just created, we need to make a small update to the Lambda function that we created in the previous article (openai_invoke_api). Change line #9 to replace the literal string to an expression that reads the input_prompt variable from the event parameter.
input_prompt=event['body-json']['input_prompt']
event['body-json'] contains the complete HTTP request body. The complete function should look like this:
import json
import openai
import boto3

def lambda_handler(event, context):
    #print(event)

    model_to_use = "text-davinci-003"
    input_prompt=event['body-json']['input_prompt']

    openai.api_key = get_api_key()
    response = openai.Completion.create(
      model=model_to_use,
      prompt=input_prompt,
      temperature=0,
      max_tokens=1000,
      top_p=1,
      frequency_penalty=0.0,
      presence_penalty=0.0
    )
    #print(response)
    text_response = response['choices'][0]['text'].strip()
    return {
        'statusCode':200,
        'body': {
            'response' : text_response
        }
    }

def get_api_key():
    lambda_client = boto3.client('lambda')
    response = lambda_client.invoke(
            FunctionName = 'arn:aws:lambda:us-east-1:388685834121:function:openai_get_api_key',
            InvocationType = 'RequestResponse'
        )
    openai_api_key = json.load(response['Payload'])['body']['api_key']
    return openai_api_key
To view the complete event parameter that is passed on to the function, uncomment line # 6.
Test the API locally
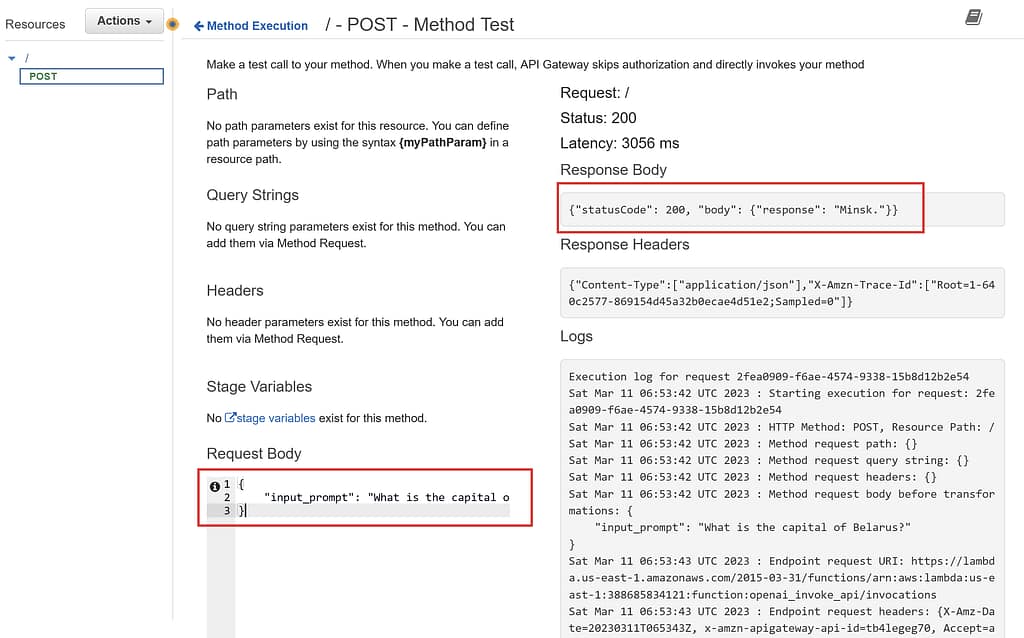
Now that we are done with configuring the API and updating the Lambda function, it’s time to test our API. Go back to the Method Execution screen and click the Test button. Enter an input prompt like this:
{
    "input_prompt": "What is the capital of Belarus?"
}
If you followed the article along and did everything as instructed, you should see a response like this. The request and response are highlighted in red boxes.
Deploy the API
Once you have successfully tested your API locally from within the API Gateway console, it is time to deploy your API and make it available for external consumption.
- Navigate to your API page
- Click Resources menu on the left menu
- Click the Actions dropdown button
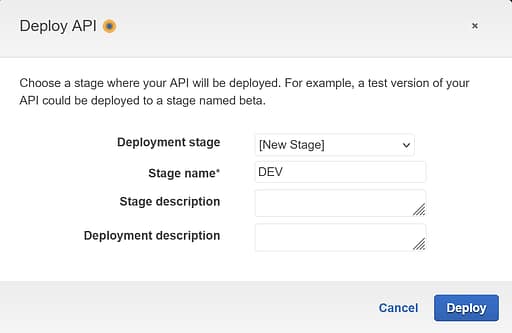
- Select Deploy API menu option

In the resulting popup, select [New Stage] from the dropdown and provide a name for the Stage. For example, if you want to deploy it to your DEV environment, enter DEV and click Deploy.
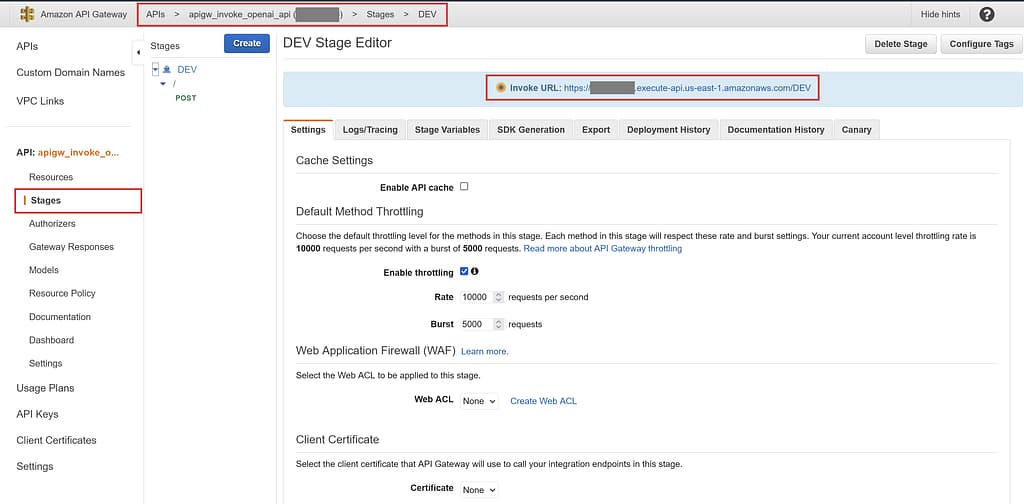
Once deployed, you will receive an Invoke Url that serves as the endpoint to the API stage deployed. The Invoke Url is specific to the STAGE and you can always get the Url by visiting your API page and selecting Stages from the left side menu.
Test the Deployed API
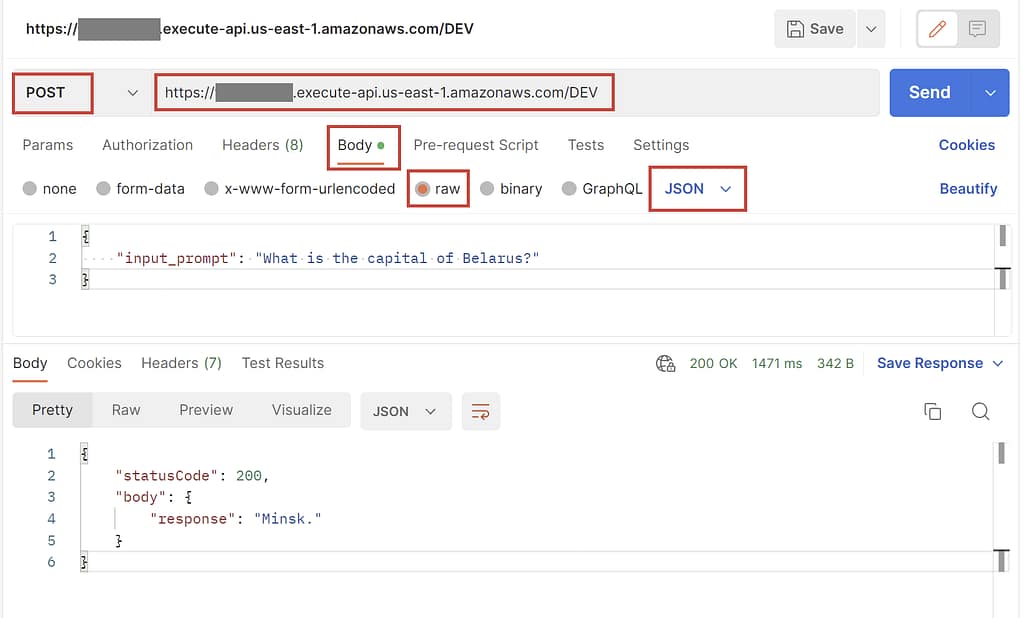
After deployment, you can test the API from a HTTP client like Postman. Make note of the highlighted elements in the image, and change them to the provided values.
Method: Post
Endpoint: https://[API_ID].execute-api.[REGION].amazonaws.com/[STAGE]
Pass the input JSON in the Body in raw format (JSON)
What next?
The example provided in this article is very basic and can be extended to handle advanced use cases. The next things you can do it to:
- Build multiple APIs on top of this template for different use cases. (each using a different model/prompt)
- Provide an authentication mechanism to protect your APIs from unauthorized use.
- Explore Messaging Templates for advanced input and output transformations between your APIs and Lambda functions.
- Build multiple Lambda functions with the ability to choose different OpenAI models
- Experiment with different OpenAI models and explore how they return different outputs for the same input which can help you decide which model is best suited for a specific use case. In the openai_invoke_api Lambda function, model is specified in Line #8.
Conclusion
I believe that you found this article and the examples provided here useful. If you enjoyed reading this article, please leave a comment and do not forget to share this article with your friends and colleagues who might be interested in the topic. Thank you and happy reading.
Great tutorial on building a REST API using Amazon API Gateway to leverage the power of OpenAI APIs! The step-by-step instructions were easy to follow, and the code samples were extremely helpful. This tutorial has provided me with a solid foundation to integrate OpenAI APIs into my own projects. Thank you for sharing this valuable resource! Keep up the great work!
-GPTOnline
[…] to invoke OpenAI APIs from AWS Lambda functions How to build a REST API using Amazon API Gateway to invoke OpenAI APIs Learn Python with […]
[…] How to build a REST API using Amazon API Gateway to invoke OpenAI APIs […]
[…] I’ve written an article on how to do this with OpenAI. You can follow the article and adapt it for DeepSeek APIs. How to build a REST API using Amazon API Gateway to invoke OpenAI APIs […]