
Read Time10 Minute, 38 Second
OpenAI provides APIs to programmatically access the functionalities provided by ChatGPT, which allows you to integrate Artificial Intelligence capabilities into your applications and services. This article provides a step-by-step guide to setting up the environment and invoke OpenAI APIs from your AWS Lambda functions. Examples are provided in Python 3.9, but you should be able to use this using any supported language. You can find a list of all supported libraries here.
Contents
Sign-up for an OpenAI Account
Go to OpenAI API portal and click on the Log In or Sign Up buttons to login to the OpenAI API portal. Sign-up or Login with your credentials. New users receive a $18 credit which is valid for 3 months. After the free credit limit is exhausted or 3 months, you’ll have to add a payment method to continue using the APIs.
Create an API Secret Key
Click on the Profile image at the top-right of the page and select ‘View API Keys’ menu. Click on the Create new secret key button. You’ll see a popup with the newly generated key. Make a note of this key since you will not be able to get the full key later on. You’ll need the full key to invoke OpenAI APIs.
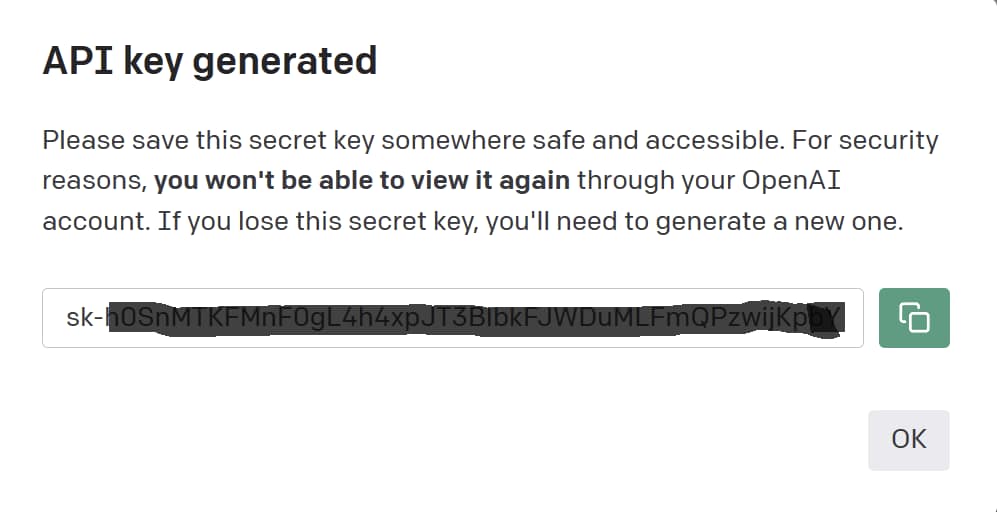
Once you’ve successfully created the key, you should see something similar to this:
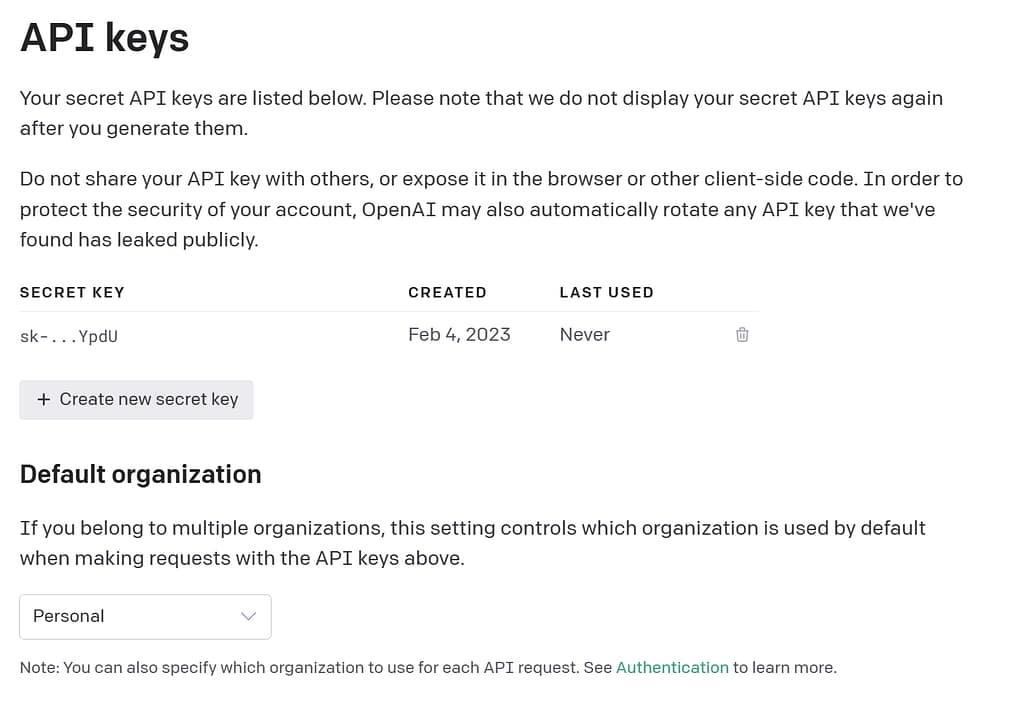
You can delete existing keys and create new ones as many times as you like. You generally delete a key when you think that a key has been compromised and someone else might be using it.
Create a Lambda Layer for OpenAI Python library
There are two ways to invoke OpenAI APIs from your Lambda functions:
1. Use the requests library and invoke the REST endpoints. This approach requires a multitude of manual configurations and is very cumbersome. This article will not discuss this approach.
Install OpenAI Python package locally
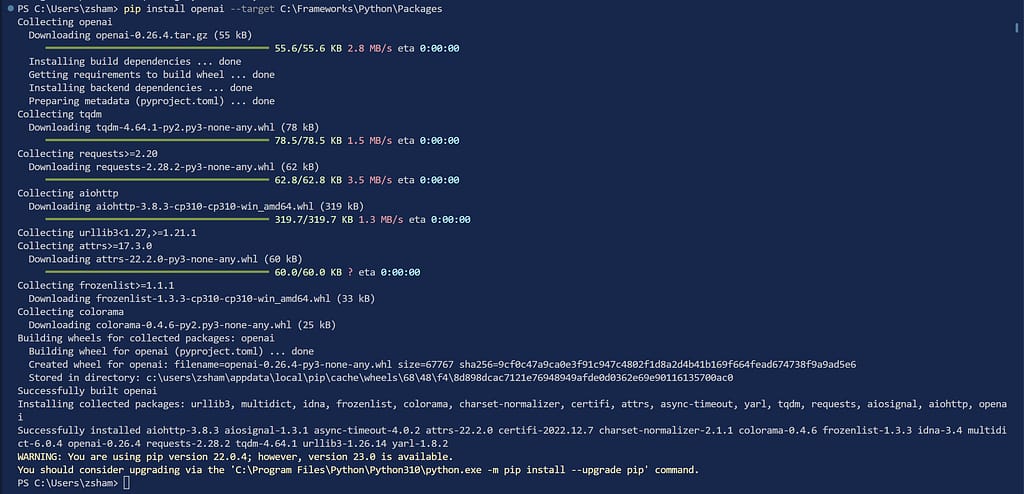
2. Use the openai Python library. The library abstracts all complexities into a simple to use python library. To use this library from within Lambda functions, you need to create a Lambda Layer. Lambda Layers make it easy to manage dependencies in Lambda functions. Layers are created using zip files that are extracted and deployed along with Lambda functions as if the files were copied locally. To create the Layer, you need to first install the library locally and create a zip file out of it. Use the following command in VS Code Terminal or Python command line to install the library to a custom path.
pip install openai --target <<local path>>
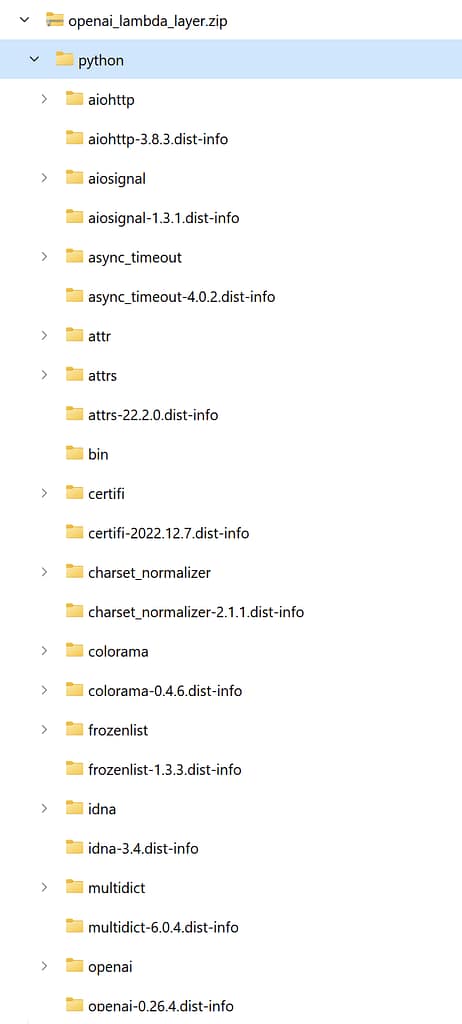
After the installation is complete, create a folder called ‘Python’ and move all files under it, and then zip the folder. The zip should look like this when extracted:
Create the Lambda Layer
- Open AWS Console
- Go to Lambda Console
- Select Layer from the left menu
- Click the Create Layer button on to top right.
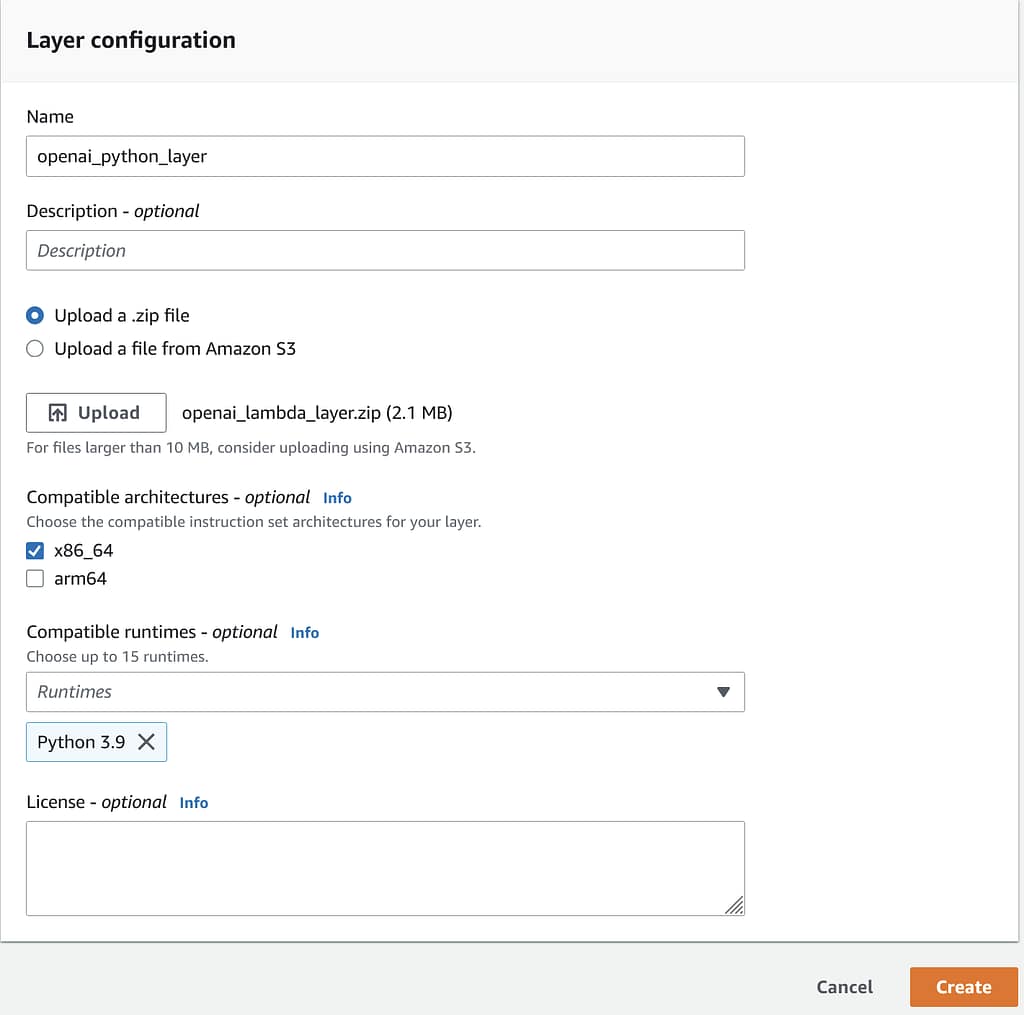
- Provide a name for the Layer. For example, openai_python_layer
- Select Upload a .zip file option and click the Upload button. Select the zip file you created in the previous step.
- Select compatible architectures. We’ll use x86_64 alone in this example.
- Select Python 3.9 under Compatible runtimes
When the final screen should look like this, click the Create button.
Create a reusable Lambda function for getting the OpenAI secret key
You need a way to store the OpenAI secret key safely and reuse it across multiple Lambda functions. We’ll do this by creating a Lambda specifically for storing the secret key in an Environment Variable and returning it. Lambdas that actually invoke the OpenAI APIs will first invoke this Lambda and get the key.
Go back to the Lambda console and click Functions on the left menu. Click Create function button and enter the following details:
Function name: openai_get_api_key
Runtime: Python 3.9
Architecture: x86_64
Under Permissions, select Create a new role with basic Lambda permissions
Click Create function button
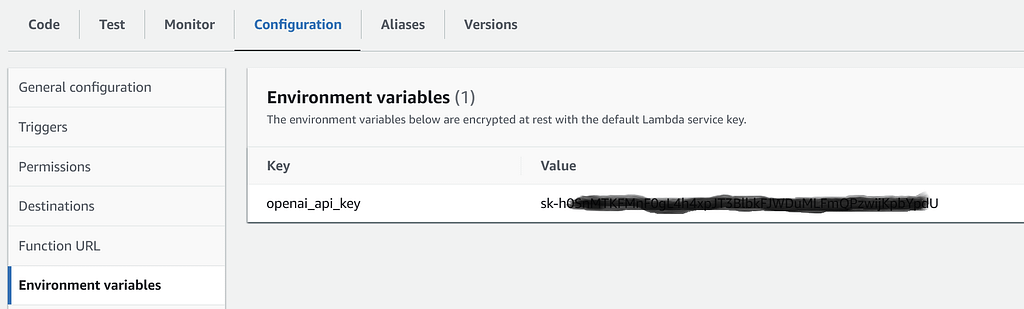
Once to the function is created, go to the Configuration tab and click Environment variables section. Click Edit and add the following item:
Key: openai_api_key
Value: <<the api key created at the beginning of this article>>
You screen should look like this:
Go back to Code section and paste the code below:
import json
import os

def lambda_handler(event, context):
    return {
        'statusCode': 200,
        'body': {
            'api_key' : os.environ['openai_api_key']
        }
    }
Test your function to make sure it returns the correct key. Using Environment variables like this makes it easy to update the key in future without changing the code also protects the key from being hard-coded in the code.
Create a Lambda function for accessing the OpenAI API
To access OpenAI API, create a new Lambda that actually invokes the APIs and receives the processes the results. Go back to the Lambda console and click Functions on the left menu. Click Create function button and enter the following details:
Function name: openai_invoke_api
Runtime: Python 3.9
Architecture: x86_64
Under Permissions, select Create a new role with basic Lambda permissions
Click Create function button.
Add Role permissions to invoke the Lambda to get API Keys.
The function that you just created needs permission to invoke the Lambda that returns the API key. Go to the Configuration tab and click Permissions section. Under Execution role section, open the Role in a new browser tab.
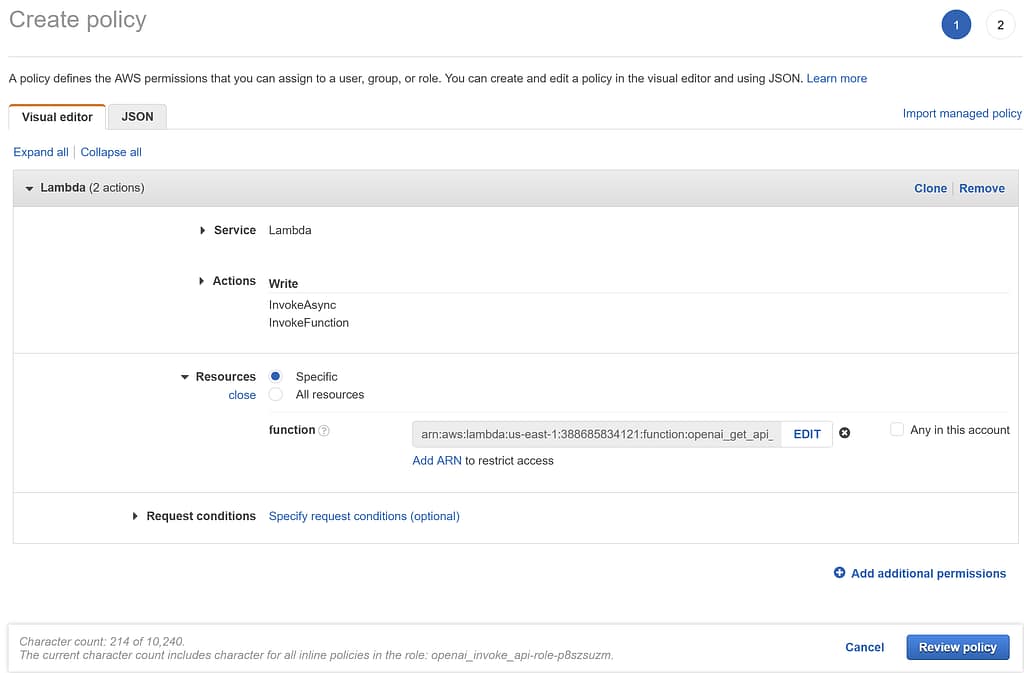
Click on Add Permissions button and select Create inline policy menu option.
Service: Lambda
Actions: InvokeAsync, InvokeFunction
Resources: <<Enter the ARN of the openai_get_api_key Lambda function>>
In the next screen, give the policy a name and create the policy
Increase Lambda Timeout
The default timeout for Lambda functions is 3 seconds. OpenAI APIs may take more than 3 seconds to execute and return a response based on the API invoked, the model used, and the input parameters provided. Increase timeout to 15 seconds or more to ensure that the Lambda function executes successfully.
Go to the Configuration tab and click General configuration section. Click the Edit button and increase the timeout in the popup and save it.
Note that Lambda functions are charged based on the execution time and higher execution time may result in higher bills.
Add Lambda Layer
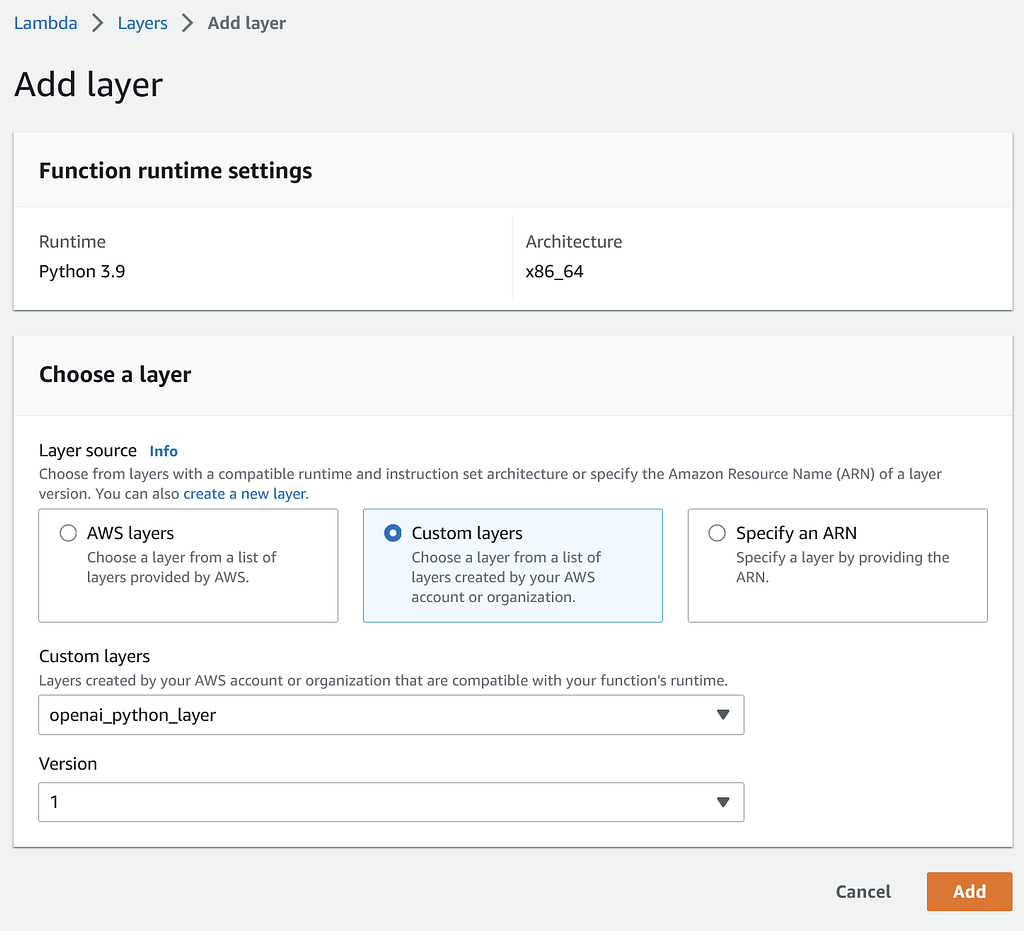
To actually start using the openai library in your Lambda functions, you need to add the OpenAI Layer your created in the previous section to your Lambda function.
In the function screen, scroll to the bottom of the page. Under the Layers section, click the Add a layer button. Click on the Custom layers option and select the Layer you created in the previous section. Select version 1 and click Add.
Invoke OpenAI API
There are many API that you can try out. Commonly used APIs are Text Completion, Code Completion and Image APIs. We will see an example of a text completion API in this article using the text-davinci-003 model.
Paste the code below into the code editor and click the Deploy button. Create a Test event and execute the code. Do not forget to change the function ARN in line # 32.
import json
import openai
import boto3

def lambda_handler(event, context):

    model_to_use = "text-davinci-003"
    input_prompt="Write an email to Elon Musk asking him why he bought Twitter for such a huge amount"

    openai.api_key = get_api_key()
    response = openai.Completion.create(
      model=model_to_use,
      prompt=input_prompt,
      temperature=0,
      max_tokens=100,
      top_p=1,
      frequency_penalty=0.0,
      presence_penalty=0.0
    )
    #print(response)
    text_response = response['choices'][0]['text'].strip()
    return {
        'statusCode':200,
        'body': {
            'response' : text_response
        }
    }

def get_api_key():
    lambda_client = boto3.client('lambda')
    response = lambda_client.invoke(
            FunctionName = 'arn:aws:lambda:us-east-1:000000000000:function:openai_get_api_key',
            InvocationType = 'RequestResponse'
        )

    openai_api_key = json.load(response['Payload'])['body']['api_key']
    return openai_api_key
You should see a response similar to this.
{
  "statusCode": 200,
  "body": {
    "response": "Subject: Question about Twitter Acquisition\n\nDear Elon Musk,\n\nI am writing to you to ask why you decided to purchase Twitter for such a large amount. As a tech enthusiast, I am curious to know what motivated you to make such a large investment.\n\nI am sure that you have a good reason for doing so, and I would love to hear your thoughts on the matter.\n\nThank you for your time and I look forward to hearing from you."
  }
}
Note that OpenAI models are generative models and they usually generate different response to the same prompt. If you receive a completely different response, you know why.
If you wish to see the complete response from the API, uncomment line # 20.
The DeepSeek API version
I’ve written an article on how to use DeepSeek API in your AWS Lambda functions. DeepSeek APIs are fully compatible to OpenAI APIs and can be used interchangeably.
Conclusion
Using OpenAI APIs, you can embed Artificial Intelligence into your applications and services. This is a powerful feature that expands the capabilities of your applications and services beyond imagination. Try out with different APIs and different models and parameters to see how this can help you augment the capabilities of your applications and services.
Enjoyed the article and found this useful? Leave a comment below with your feedback and suggestions.
This was awesome! Thanks so much 🙂
You might have a small typo in using the lambda function “ openai_get_api_key” twice. That tripped me up a bit 🙂
Do you have any resources for how to turn this lambda function into an API Gateway API? I am trying to do that now so I can call it from an Amplify React app, and getting a little stuck.
Thanks!
Hi Laura,
Glad you liked my article, and thank you for pointing out the typo. I have fixed it and I apologize for the confusion.
I will write an article on invoking the Lambda function from an API Gateway API soon. If you need a solution immediately, it is pretty straightforward. Create an API, create a GET/POST action, select integration type as Lambda and select the Lambda function, configure Request and Response integration and you’re done.
Check this out: https://docs.aws.amazon.com/apigateway/latest/developerguide/getting-started-with-lambda-integration.html
Here you go: https://thedeveloperspace.com/how-to-build-a-rest-api-using-amazon-api-gateway-to-invoke-openai-apis/
Really good step-by-step instruction. Thanks a lot, it was helpful!
Thank you Natali, I’m glad that you found it helpful.
Waiting for an article on invoking the Lambda function from an API Gateway API! Please and thanks!
An article is on its way and will be published in a few days. In the meantime, here’s a API Gateway resource you may find useful.
https://www.youtube.com/watch?v=-AXSz3jlGiY
Here you go: https://thedeveloperspace.com/how-to-build-a-rest-api-using-amazon-api-gateway-to-invoke-openai-apis/
Hi! Thanks for this article! I’m having an error when I test the lambda_function.py code of the openai_invoke_api:
“Unable to import module ‘lambda_function’: No module named ‘openai'”
May you please help me?
Thanks a lot!
Hi David, make sure:
1. The openai Lambda Layer is created properly without errors
2. Layer is referenced in the Lambda function correctly
3. The Python version of the Lambda function and the Lambda Layer are the same or are compatible.
@David
Make sure when you create Lambda layer, your zip file has following structure
Example file structure for the Pillow library
pillow.zip
│ python/PIL
└ python/Pillow-5.3.0.dist-info
Source: https://docs.aws.amazon.com/lambda/latest/dg/configuration-layers.html
Thanks Manoj for the comment. The folder structure of the layers is the single biggest reason for layer issues.
Hi. Great article. However I get one error and I am not sure what I did wrong. When calling get_api_key() it fails with following error:
[ERROR] ClientError: An error occurred (AccessDeniedException) when calling the Invoke operation: User: * is not authorized to perform: lambda:InvokeFunction on resource: arn:aws:lambda:*:function:openai_get_api_key because no identity-based policy allows the lambda:InvokeFunction
COuld this be the issue?
https://ibb.co/ssbTJY5
Hi Matija,
This is an IAM permission issue. Please make sure that the IAM Roles with the correct policy to invoke the Lambda is set up properly. Make sure that the correct Account # is used in the policy.
[…] of my previous articles provided a step-by-step guide to invoke OpenAI APIs from AWS Lambda functions. This […]
Great tutorial! It provided clear and concise instructions on how to integrate OpenAI APIs with AWS Lambda functions. I appreciate the step-by-step approach, which made the process easy to follow and implement. The code snippets were incredibly helpful as well. Thank you for making it so user-friendly! Keep up the excellent work.
-GPTOnline
Hello
Nice tutorial, but when i run the lambda I get this error”errorMessage”: “Unable to import module ‘lambda_function’: cannot import name ‘DEFAULT_CIPHERS’ from ‘urllib3.util.ssl_’ (/opt/python/urllib3/util/ssl_.py)”,
Hi Patricio,
You are probably using a botocore version that doesn’t support urllib3. Check your Python version for the Lambda and try changing it to see if it works.
Thanks you so much,
but I am getting below error while testing
Response
{
“errorMessage”: “Unable to import module ‘lambda_function’: No module named ‘openai'”,
“errorType”: “Runtime.ImportModuleError”,
“requestId”: “abf43fac-e95e-43a9-a38e-2f87f2bed58f”,
“stackTrace”: []
}
Hi Akhil,
I guess there is an issue in the folder structure of the Lambda layer. It must be \python\opeai from the base folder.
Thanks,
Shameeel
Thanks a lot Ahmed, I changed the path and I have one more question do we need to deploy every time when the inputprompt in the function changes ?
If input_prompt is passed to the function as a parameter, then you don’t have to redeploy the function. If you have hardcoded the input prompt, then you have to.
Hi everyone,
I am getting the common error: {
“errorMessage”: “Unable to import module ‘lambda_function’: No module named ‘openai'”,
“errorType”: “Runtime.ImportModuleError”,
“requestId”: “cfa83f09-4ce8-4047-b0d6-a0632370f751”,
“stackTrace”: []
}
But the structure should be correct with a zip-folder named python, where the openai-folder lays.
So:
|-python (zipped –> the one i am uploading)
|—- openai
|—- all other dependencies
Hi Anna,
The top level folder should be called python and all folders should be under it.
Like this:
|-python (zipped –> the one i am uploading)
|—- python
|—— openai
|—— all other dependencies
Hi this is Arunkarthik Periyaswamy. Since lot of people in the comment also faced the same issues which I faced. I will add the solution for those errors.
1. “Unable to import module ‘lambda_function’: cannot import name ‘DEFAULT_CIPHERS’ from ‘urllib3.util.ssl_’ (/opt/python/urllib3/util/ssl_.py)”
This is because openai urllib3
Solution : Open any folder and type this command “pip install openai requests==2.29.0 urllib3==1.26.16 -t python” this will install pip with these specific versions of requests and urllib3
2. Folder structure error –
“errorMessage”: “Unable to import module ‘lambda_function’: No module named ‘openai’”,
“errorType”: “Runtime.ImportModuleError”,
This is caused because of the some issue while zipping the file
Solution: Zip the above folder using this command “zip -r python.zip python”
Hi Arun,
Thanks for sharing your tips.
Thanks,
Shameel
I am getting an error that says. I was researching the this pydantic core error has to do with Fast.AI? Anyone else get this error too or know of a solution?
{
“errorMessage”: “Unable to import module ‘lambda_function’: No module named ‘pydantic_core._pydantic_core'”,
“errorType”: “Runtime.ImportModuleError”,
“requestId”: “37312d56-02f5-4080-8c7e-ed4f04f1a749”,
“stackTrace”: []
}
Did you find a solution to this?
+1, I am having the same issue
+1
If you are uploading the layer files from a Windows PC, make sure you select the correct architecture in the runtime settings for the Lambda. Most dependency errors occur due to wrong architecture and python version mismatch.
Hi Devon,
I encountered a similar error a while back, but now it seems to have been resolved. I recommend trying to import the OpenAI modules with the correct version of Python (Recommended: Python 3.9.13).
Thank you.
{
“errorMessage”: “module ‘openai’ has no attribute ‘Completion'”,
“errorType”: “AttributeError”,
“requestId”: “47ba78f2-18cd-41cb-9352-6f15972e5b90”,
“stackTrace”: [
” File \”/var/task/lambda_function.py\”, line 11, in lambda_handler\n response = openai.Completion.create(\n”
]
}
[…] How to invoke OpenAI APIs from AWS Lambda functions How to build a REST API using Amazon API Gateway to invoke OpenAI APIs Learn Python with ChatGPT […]
[…] Alternatively, you can create a Lambda Layer with the DeepSeek library and then use the Layer in the Lambda function. For information on how to do it, please check my article that discussed how to invoke OpenAI APIs from Lambda functions. How to invoke OpenAI APIs from AWS Lambda functions […]
[…] context, developers have long been able to use OpenAI’s models from within AWS by calling its public API. AWS has also supported a small subset of OpenAI’s open-weight GPT-OSS models through Bedrock and […]